A simple yet powerful addition to your Data Studio dashboard UI!
Less than 2 weeks ago I released the Search Console Explorer Studio, a free Data Studio dashboard to help explore your Google Search Console data and discover new insights.
In the post, I mentioned a feature I wanted to include but needed to do a write up first. Here it is!
This ‘feature’ allows you to further refine and slice your data on interaction based on custom fields and definitions.
This combination can be used in many ways and I will show a few of these below. You can jump ahead if you prefer:
- What is it?
- Setup
- CASE Generator
- Examples and Applications
- Adding this to the Search Console Explorer Studio
TLDR;
Use CASE statements to create Custom Fields for use within a treemap chart, creating a custom clickable filter in Google Data Studio.
Jump to the CASE generator, see the filter in action or go straight to the examples.
You can drop this feature into the Search Console Explorer Studio and start using this for keyword groups. You can also use this for a brand and non-brand divide, using this on any or all pages in the report. Both are covered in more detail further-in.
Note: To add a custom field you need to connect to your own dataset.
If you are adding this to the Search Console Explorer Studio you will need to make a copy and you can do this seamlessly as outlined here.
So, What Is It?
Using CASE in calculated fields, you can group and redefine data. By leveraging this in an interactive treemap chart, we get this beauty – a clickable custom filter.

If you are familiar with treemaps, you may be thinking how / why are these equally divided? By setting the division by the number of groups contained (so itself), this creates an equally divided filter. Horray!
If you would prefer these to remain sized according to their contribution, this is the default behaviour and you can just choose the preferred metric.
Let’s see an example in action before we dive in:
The below example demonstrates two treemap filters in play with Channel and Product Groups being used together (Google Analytics).

In the above example, I can refine product sales by Channel, then further refine by Product Type (‘Filter by Type’), with both filter labels being dynamic respectively.
This means as I refine by Product Type I can see which Channels are applicable and vice versa.
So, by isolating ‘Cards’ as a product type and ‘Email’ as a Channel, I can easily identify the top performing ‘Cards’ from our Email campaigns.
Setup
Setup is simple. You add a treemap, set custom field with CASE statement and enable interactions! The steps have been outlined below:
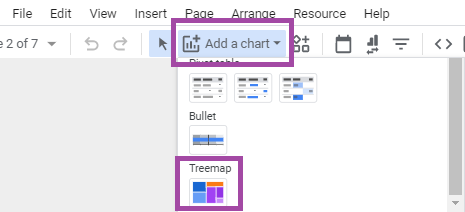
1. Select a Treemap chart and place this.
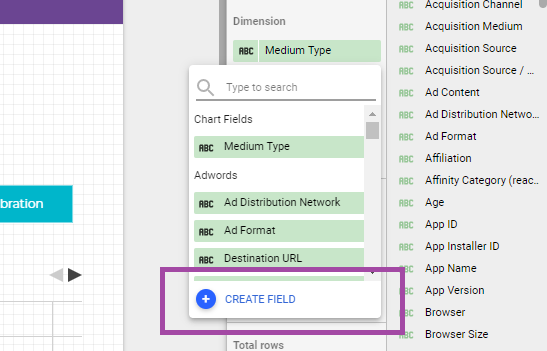
2. Click on Add Dimension and ‘Create Field’ as highlighted below.
3. Use the CASE generator to create the statement needed:
CASE for Keyword Groups (examples aligned to sample search console data)
CASE
WHEN REGEXP_MATCH(Query, '.*youtube.*|.*you tube.*') THEN 'YouTube'
WHEN REGEXP_MATCH(Query, '.*shirt.*|.*hood.*') THEN 'Tops'
WHEN REGEXP_MATCH(Query, '.*sunglass.*|.*hat .*|.* cap.*') THEN 'Head'
WHEN REGEXP_MATCH(Query, '.*bike.*|.*cycle.*') THEN 'Wheels'
WHEN REGEXP_MATCH(Query, '.*bottle.*|.*backpack.*|.*bag .*') THEN 'Extras'
ELSE "Other"
END
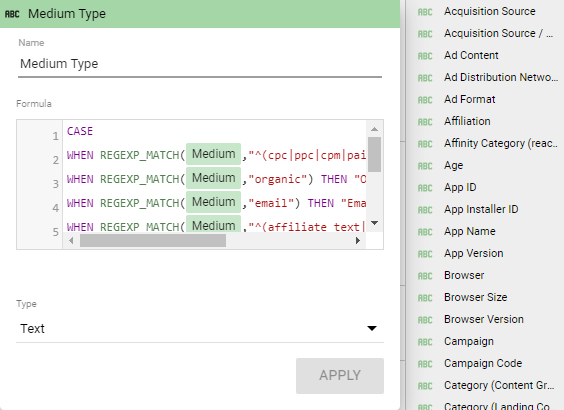
4. Paste your CASE statement into the Formula section and name the field. Click Apply.
5. Ensure Interactions are enabled
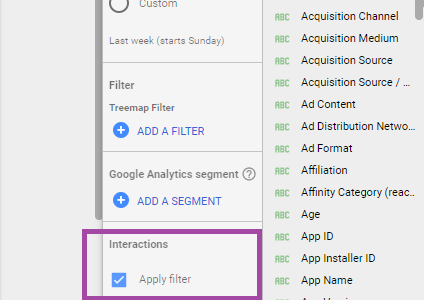
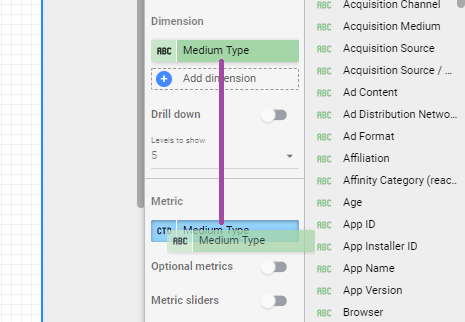
To achieve equal divide, drag Dimension (custom field) into Metric. This will convert to a ‘CTD’ type which is Count Distinct. Otherwise, select preferred metric.
Tip! The metric sliders (toggle shown above) are worth an explore! Released over the weekend, this is a new addition.
Hopefully, you now have something like this:

To match the same design, the tweaks I have applied under the ‘Style’ tab include:
– Untick both ‘Show branch header’ and ‘Show scale’.
– If set to equal divide, only the middle colour option of the three settings will apply.
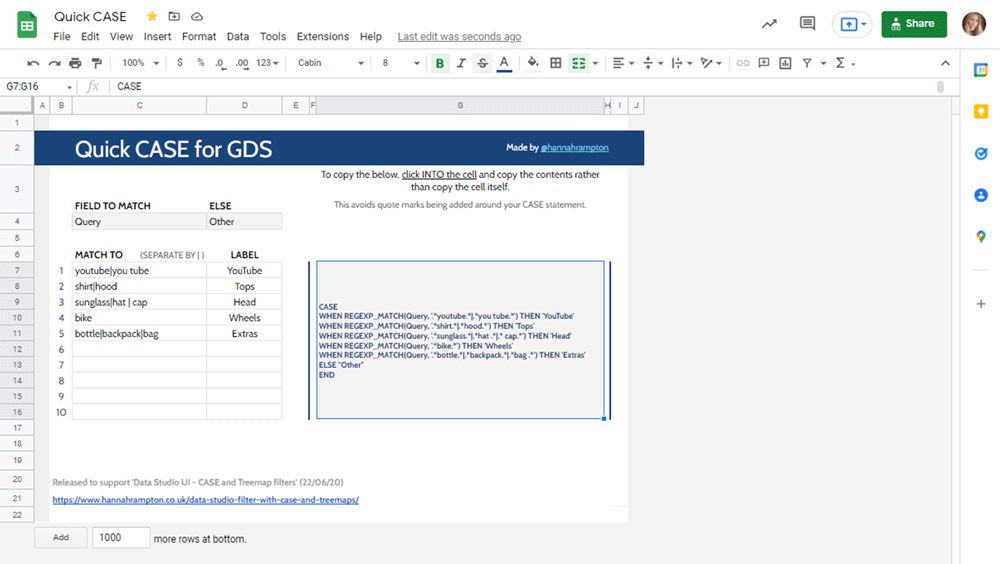
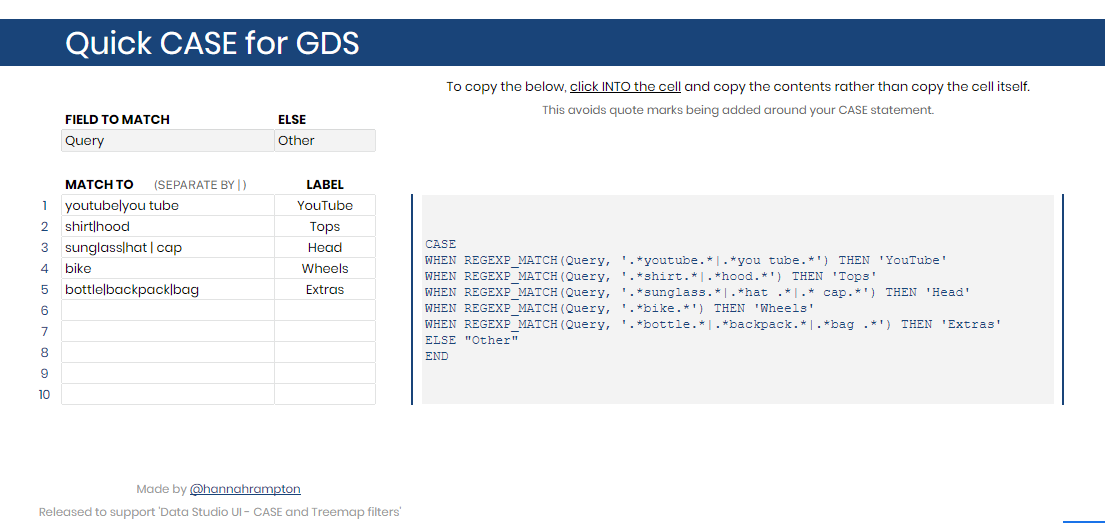
CASE Generator
I have created a simple CASE generator to simplify and support this process.
This can be used for all of the examples below and this makes it quicker and easier for you to set your custom definitions, copying the result generated and adding this as a custom field. This tool accommodates up to 10 groups so this should be plenty.
Note: The default field to match to is set to ‘Query’ so this will work out of the box for Search Console Data and in the Search Console Explorer Studio however this can be changed in the denoted cell.
Example Applications and Setup
To help inspire you on the seemingly endless applications for this, I will cover the following examples and a few ways these can be applied.
- Keyword Groups (Search Console)
- Brand vs Non Brand (Search Console)
- Product Groups (Google Analytics)
- Channels (Google Analytics)
Remember, these ‘filters’ simply refine the data so it’s all about the context these are used to determine what they unlock!
I have covered examples across both Search Console and Google Analytics to help demonstrate how you can use this addition with all other data and take your GDS UI to the next level.
Before we dive in, don’t be alarmed if CASE statements are new to you! The CASE generator will handle this for you.
Let’s Dive In!
Keyword Groups
I expect the most common use for this will be custom keyword groups.
Using the CASE Generator, we have set custom groups for keyword matches. The below is an example:
Example CASE for Keyword Groups
CASE
WHEN REGEXP_MATCH(Query, '.*card.*|.*day.*') THEN 'Card'
WHEN REGEXP_MATCH(Query, '.*pen.*|.*planner.*|.*journal.*|.*pad.*') THEN 'Stationery'
WHEN REGEXP_MATCH(Query, '.*parker.*|.*lamy.*|.*moleskin.*') THEN 'Brand'
WHEN REGEXP_MATCH(Query, '.*wedding.*|.*hen .*|.*baby shower.*') THEN 'Celebration'
ELSE "Other"
END
Follow the guidance here to apply this statement. You see this in action in the main example and this is the same on a smaller scale below with brand and non-brand.
Brand vs Non Brand
Using the CASE Generator, you can set custom groups for Brand and Non-brand using the Query field in Search Console data.
With this covering Brand and Non-Brand alone, I was able to change ‘ELSE “Other”‘ to ‘ELSE “Non-Brand”‘.
Here is an example CASE statement:
Example CASE for Brand and Non-Brand
CASE
WHEN REGEXP_MATCH(Query, '.*hannah.*|.*rampton.*|.*butler.*') THEN 'Brand'
ELSE "Non-Brand"
END
Follow the guidance here to apply this statement. Here it is in action:
Product Groups
Using the same CASE statements as we used for Query in Keyword Groups, it is often as simple as updating the field from Query to Product and using the same matches.
You can do this in the CASE generator by updating field. Change ‘Query’ to ‘Product’ and apply the field to your Google Analytics dataset.
You can see this in action in the main example.
Channels
To configure your channel groups, I recommend you reference Google Analytics directly to see what you need to capture and use the CASE generator accordingly. For example, Affiliates will not be relevant to all websites.
To build Channels, you are grouping by Medium so you need to set Medium as the field to match.
View your Acquisition reports in Analytics for Source / Medium and create or mirror your ‘Default Channel Grouping’. You can see this in action in the main example.
An example CASE statement would look like:
Example CASE for Channels – CUSTOMISE ACCORDING TO YOUR ANALYTICS DATA!
CASE
WHEN REGEXP_MATCH(Medium,"^(cpc|ppc|cpm|paid)$") THEN "Paid"
WHEN REGEXP_MATCH(Medium,"organic") THEN "Organic"
WHEN REGEXP_MATCH(Medium,"email") THEN "Email"
WHEN REGEXP_MATCH(Medium,".*affiliate_text|affiliate_banner.*") THEN "Affiliate"
WHEN REGEXP_MATCH(Medium,"referral") THEN "Referral"
WHEN REGEXP_MATCH(Medium,".*facebook.*|.*instagram.*|.*pinterest.*") THEN "Social"
ELSE "Other"
END
Adding to the Search Console Explorer Studio
You are not able to create custom fields on Sample Search Console data and as a result, I cannot create these for you as part of the released ‘plug and play’ tool.
To add these to your Search Console Explorer Studio you need to have made a copy of the dashboard and switched the sample data with your own. This is easily achieved if you set the data sources at the point of making a copy so that all elements transfer seamlessly.
To make a copy and switch the dataset for your own, follow these steps:
- Go to the Search Console Explorer Studio v1 / Search Console Explorer Studio v2
- File > Make a Copy
- Select the direct connections needed to replace both of the Search Console datatypes, being Site and URL connections. Match these two accordingly and copy.
By updating the data connections at the point of copy, this transfers each component over to the new respective source. Once you have done this you will be able to create custom fields in your dashboards. If you want a visual aid for this process, see further down:
Update: The bubble charts are struggling to transfer at this present time (22/06/20), the connection will transfer no problem but to re-enable the visuals go to the Style tab and set bubble colour as Query:
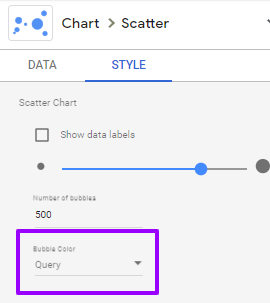
There have been some very recent changes to replacing data sources but with two datasources used on each page, this still seems to be the quickest way to transfer (even with the bubble chart corrections highlighted). I assume the bubble colour setting not switching over is temporary.
If you want a visual aid for making a copy and switching connections, see below:
I hope this helped! Please share or if my tools have helped you, please consider buying me a coffee to say thanks.
I will do some videos soon but in the meantime, reach out if you get stuck and I will try to help.